


Whether you’re going on a short overnight trip or a months-long thru-hike, finding the best backpacking backpack is fundamental to success. It not only needs to hold all your necessary gear, but it should also be comfortable enough that you don’t spend the day fidgeting or thinking about your pack.
As a thru-hiker, climber, and packrafter, my experience wearing a pack is deep. After loads of research and miles upon miles of rigorous testing, I found the best packs for every use and budget, whether that’s a do-it-all winner like the Gregory Paragon and Maven or something a bit more spend-wise like the REI Co-op Flash 55.
Because no single pack works for everyone, I’ve also broken the list into categories to help you find the perfect fit. Check out our team’s suggestions below, and load up for the weekend.
Editor’s Note: We updated our Backpacking Backpacks guide on October 30, 2025 to add the Mountain Hardwear AMG 75, an expedition-ready load hauler that we took to Alaska’s Brooks Range for proving.
The Best Backpacking Backpacks of 2025
Best Overall Backpacking Pack
8.9/10 Rating
Best Budget Backpacking Pack
7.8/10 Rating
Best Lightweight Backpacking Pack
8.4/10 Rating
Thru-Hiker’s Fan Favorite
8.3/10 Rating
Most Rugged Backpacking Pack
8.0/10 Rating
Best Heavy-Hauler Backpacking Pack
7.7/10 Rating
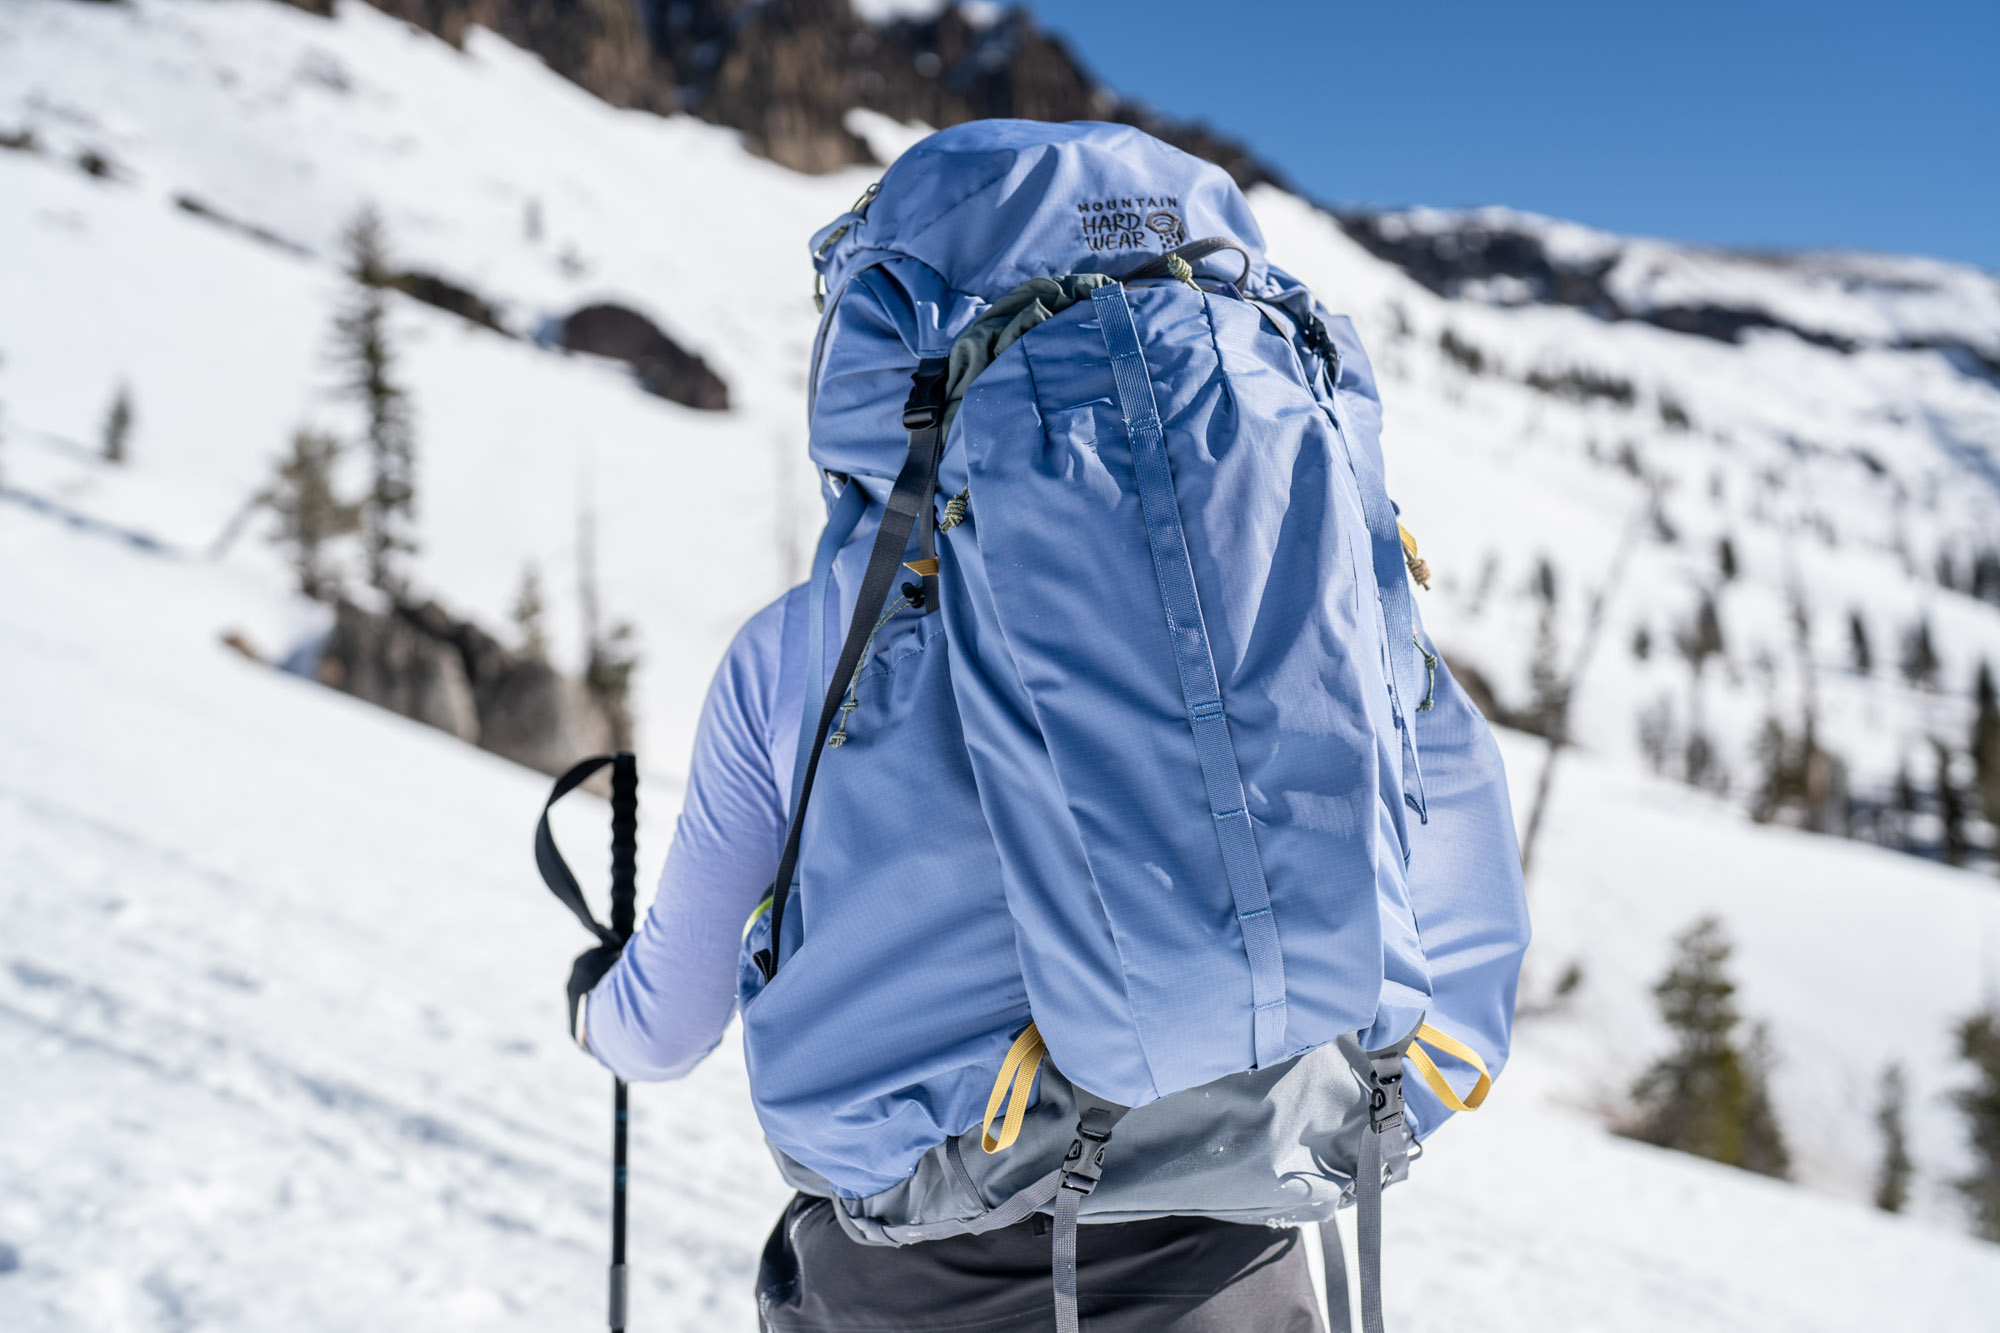
Best Expedition Backpack
7.8/10 Rating
See more picks
-
Hip belt offered great support -
Can comfortably carry up to 50 lbs. -
Stash spot for your inReach on shoulder strap -
Side-loading zippered pocket -
PFAS-free
-
Not the most mobile pack -
Size range of available frames isn’t very wide -
No rain cover included -
Design caused back pain (specific to Maven Women’s version)
-
Lightweight at under 3 pounds -
Molded back panel is comfortable and adjustable -
Relatively inexpensive price -
Easy to customize with add-on storage bags
-
Not quite as durable as other models -
Doesn’t carry heavy loads as well as other models
-
Extremely comfortable for its low weight -
Efficient suspension system -
Great ventilation on the suspended back panel -
Adjustable fit dials in the comfort for most folks
-
Some extra features seem gimmicky and unneeded -
Compression system is somewhat awkward to use and impacts the usability of the hip belt pockets
-
Quite durable given its ultralight construction -
Stable and comfortable compared to other ultralight models -
Side and front external pockets have drain holes and reinforced bottoms -
Can be stripped down to a frameless version for quick and light missions
-
Minimal features -
Expensive
-
Access:
Roll top -
Tested Weight:
2 lbs., 1.8 oz. -
Volume:
68L total; 39L internal, 21L external -
Material:
ULTRA 400X/ULTRA 200X Fabric + UltraStretch Mesh -
Outside Storage:
Two zippered hip belt pockets, two adjustable side water bottle pockets, front shove-it pocket, ice axe/trekking pole attachments -
Hip Belt:
Removable -
Frame Style:
1.2 oz carbon fiber and Delrin suspension hoop, a dense internal foam frame, and a single aluminum stay -
Sizing:
Small, Medium, Large, X-Large -
BV500 Bear Can Fit:
Vertically
-
Very durable water-resistant ULTRA 400X and 200X fabric -
Super comfortable and highly adjustable -
Customizable ordering for personal sizes — shoulder straps in particular -
Roll top with Y strap that can be replaced -
Roll top buckles clip both ways -
Fits bear cans both inside and on top
-
Not seam taped/waterproof -
Strap connections aren’t secured completely; can come off -
Expensive
-
Solid suspension system that balances heavy loads well -
Durable fabric -
Comfortable cushion on the hipbelts and shoulder straps
-
Quite heavy at nearly 5 pounds -
Tall side pockets can be difficult to access when pack is loaded
-
Hardened design puts up with carrying sharps and bulky kit like ropes -
Very cushioned frame and pivoting hip belt -
Sport-specific features such as an avalanche tool pocket and sled-rigging points -
Volume reduces well when it isn’t needed
-
Heavy backpack at 4+ pounds -
Not a wide size range offered
Other Backpacks That’ll Carry Your Kit
While the seven packs above are my top choices for backpacking bags, there are certainly more out there. We’ve been testing packs for almost two decades now, and in that time, a number of excellent alternatives have emerged.
-
Quite comfortable at a wide load range -
Customizable sizing -
Tough 420D exterior fabric -
Lots of options for outside storage -
Pretty much any accessory feature you could want included
-
On the heavier side -
Not a lot of upper-body mobility -
Doesn’t like to be under filled
-
Price -
Comfortable hip belt with wide range of sizes -
Easy torso adjustment -
Easy on the budget -
Low-angled water bottle pockets
-
Relatively small front pocket -
Non-removable lid -
No side mesh pockets
-
More durable exterior fabrics than most Gregory packs -
Extremely breathable back panel design -
Comfortable design carries heavy loads well -
Deep feature set -
Side zipper panel access is large and easy to use
-
On the heavier side -
Only one side mesh pocket -
Best used with a full pack, and isn’t the most mobile for off-trail use
-
Solid performance for the price -
Inclusive sizing -
Floating lid doubles as a hip pack -
Included rain cover -
Side bottle holders are easy to access with the pack on
-
A bit on the heavier side -
Doesn’t carry heavy loads the best
-
Impressive load carrying for the UL pack weight -
Ultra 200X material is supremely tough, while still being light -
Cottage industry attention to detail and frequent design updates driven by feedback -
Easy-to-access shoulder strap pockets
-
Not the lightest UL pack out there, and 55 L is a lot for some summer load-outs -
No stretch bottom pocket for snacks -
Availability can sometimes be tough
-
Breathable suspended back panel -
Rugged CORDURA fabrics make this pack tough -
Front stash pocket opens very wide for stashing items like wet tent flies -
Hydration pack converts into daypack
-
Front stuff pocket can be overloaded and pop open -
Buckles for lid and compression are very similar, and can be confused
-
Pre-curved frame provides excellent comfort -
UHMWPE fabric is uber tough -
Water bottle pockets are front-angled and easy to snag -
Top Y-strap wrangles bulky items like bear canisters -
Compatible with REI Packmod accessories
-
Back panel doesn’t have the best ventilation -
Not fully waterproof design — will need other waterproofing solution -
Not the lightest option out there at nearly 2 pounds
-
Lightweight for its carrying capacity -
Well-ventilated -
Carries heavy loads comfortably
-
Takes some time to figure out how to adjust shoulder straps and hip belt -
Still uses a DWR finish with PFAS
Backpacking Backpack Comparison Chart
| Backpacking Backpack | Price | Tested Weight | Volume | Materials | Exterior Pockets |
|---|---|---|---|---|---|
| Gregory Paragon 60 & Maven 58 | $300 | 3 lbs., 8 oz. (men’s S/M) | 60; 58 L | 100D/210D nylon ripstop body + 300D bottom, 135D polyester lining | 6 |
| REI Co-op Flash 55 | $219 | 2 lbs., 10 oz. | 55L | Nylon (100D & 420D) | 9 |
| Osprey Exos & Eja 58 | $280 | 2 lbs., 13 oz (S/M) | 58L (S/M); 61L (L/XL) | Nylon (100D & 400D) | 6 |
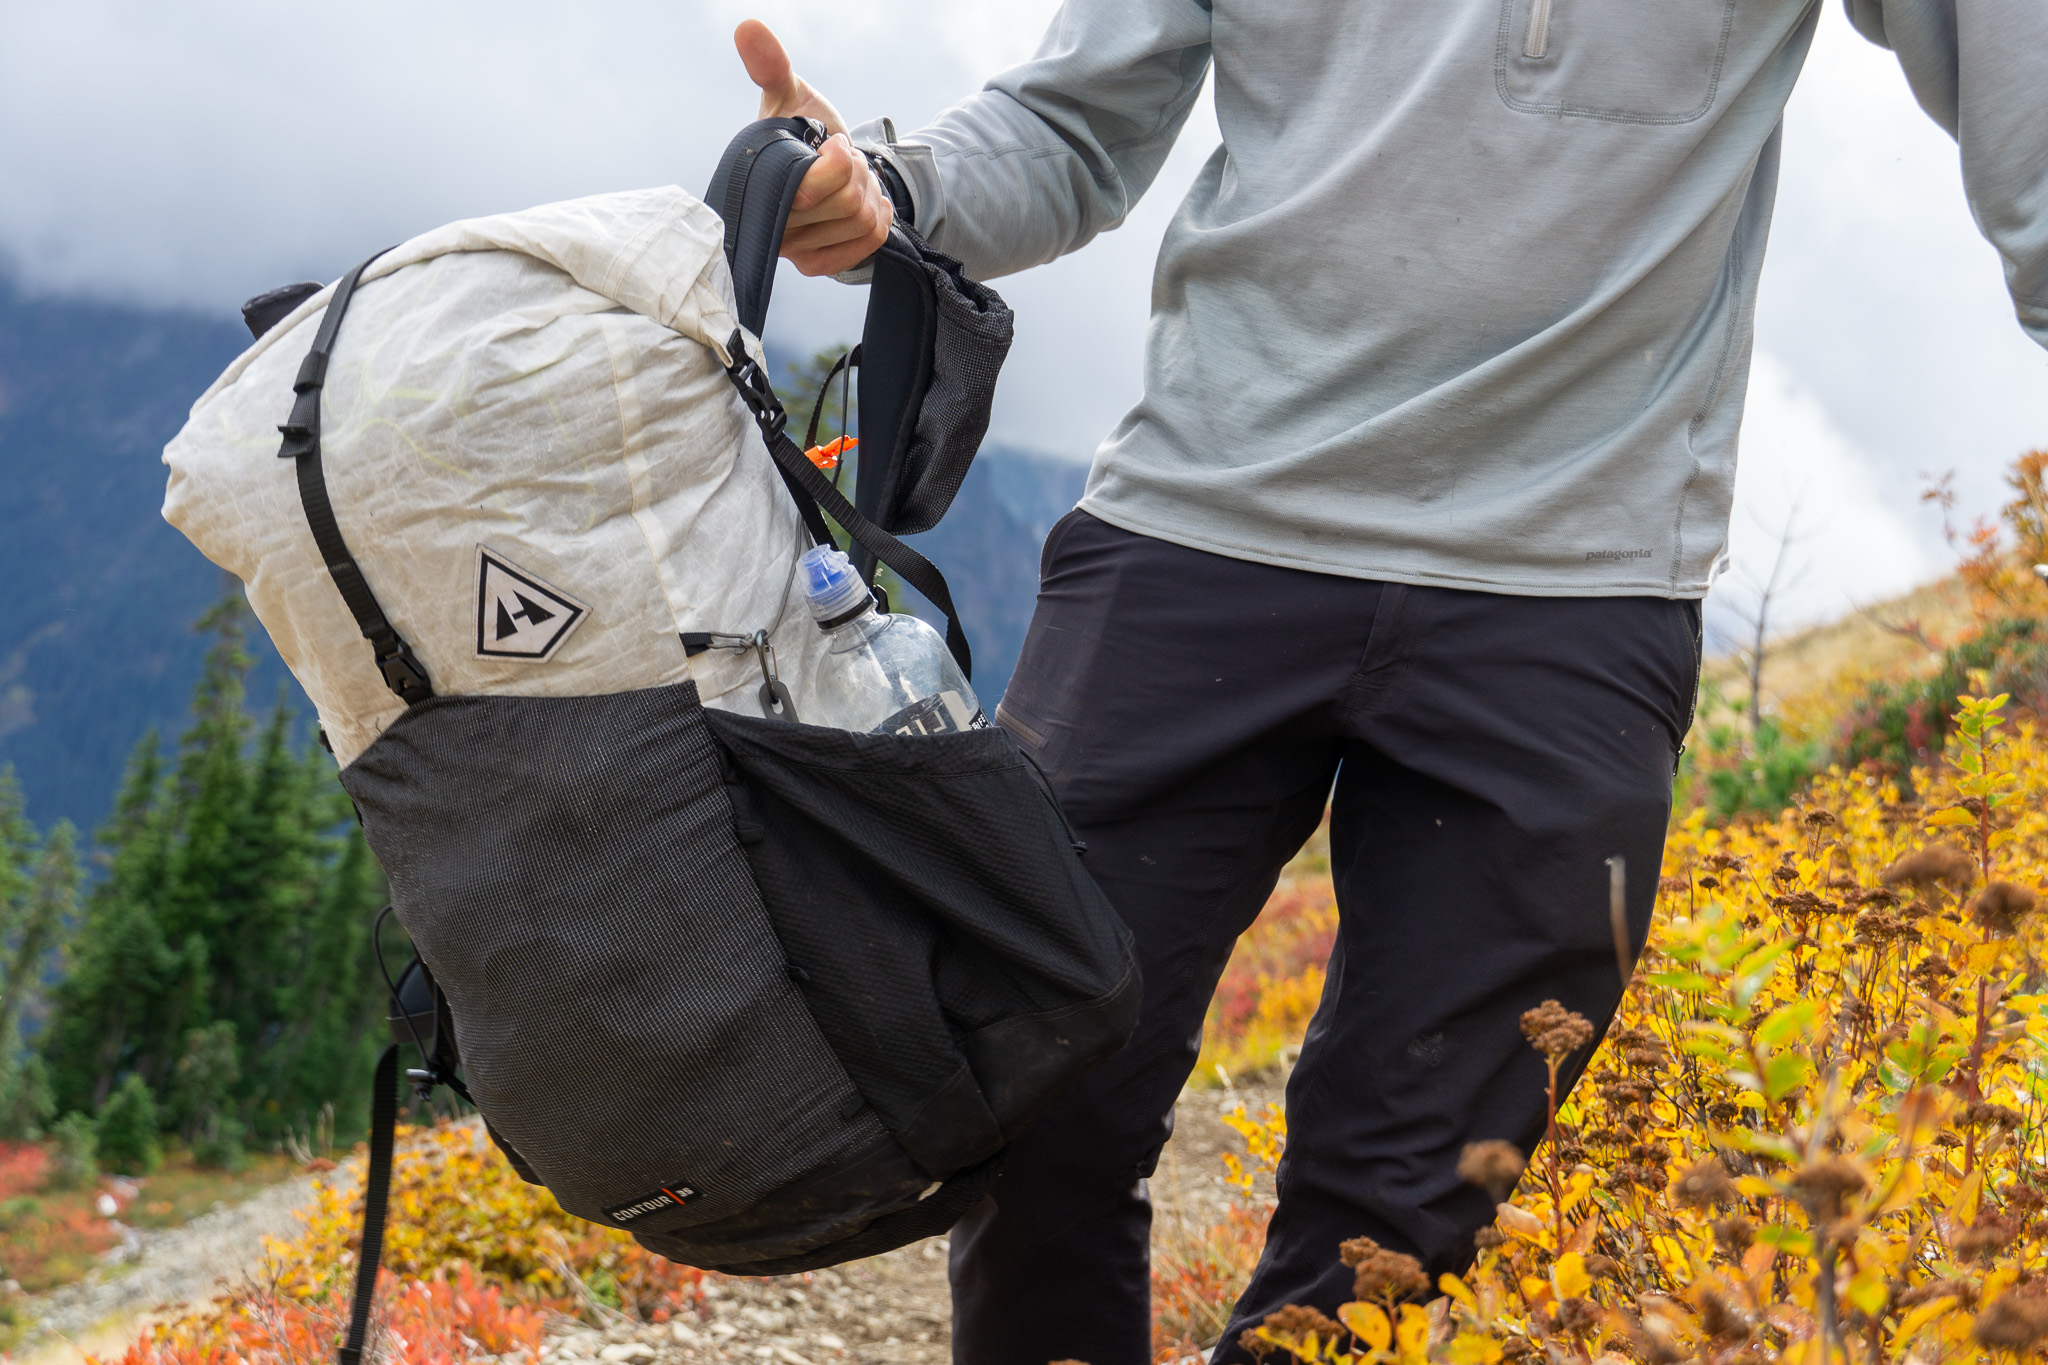
| Hyperlite Mountain Gear Southwest 55 | $379 | 1 lb., 15 oz. | 55L | Dyneema Woven Composite 3.9 | 5 |
| ULA Circuit Ultra | $380 | 2 lbs., 1.8 oz. | 68L | Ultra 400X/Ultra 200X Fabric + UltraStretch Mesh | 5 |
| Gregory Baltoro 75 | $380 | 4 lbs., 13.2 oz. | 75L | Nylon (210D & 630D), polyester (135D) | 9 |
| Mountain Hardwear AMG 75 | $440 | 4 lbs., 13.1 oz. | 75 L | 200D UHMWPE nylon and Ultra 400X accent, 840D nylon base | 5 |
| Osprey Aether & Ariel 55 | $325 | 4 lbs., 13.9 oz. (M/L) | 55L | Nylon Packcloth (210D & 420D) | 7 |
| REI Co-op Trailmade 60 | $179 | 3 lbs., 6 oz. (Regular) | 60L | Recycled nylon, unspecified denier | 6 |
| Gregory Katmai 65 & Kalmia 60 | $330 | 4 lbs., 13 oz. (M/L) | 65L, 60L | Nylon (210D & 420D) | 7 |
| REI Co-op Traverse 60 | $269 | 4 lbs., 7 oz. (women’s S/M) | 60L | 210D and 400D ripstop nylon exterior, and lining: 200-denier recycled polyester lining | 9 |
| Durston Kakwa 55 | $279 | 1 lb., 14 oz. | 55L | Ultra 200X or UltraGrid | 6 |
| Mountain Hardwear PCT 50 & 55 | $280 | 4 lbs., 1.3 oz. (women’s S/M) | 50, 55 L | 210D CORDURA nylon ripstop body, 70D nylon ripstop lining | 7 |
| REI Co-op Flash Air 50 | $299 | 1 lb., 15 oz. | 50L | UHMWPE ripstop nylon (87% nylon/13% polyethylene) | 7 |
| Granite Gear Blaze 60 | $300 | 3 lbs. | 60L | Nylon (100D & 200D) | 6 |
How We Tested the Best Backpacking Backpacks
Our backpack testing aims to cover both in-field impressions and bench measurements to provide a comprehensive picture of the product’s performance. Here’s the breakdown on how we rate them.
- Field testing: Our backpacking tests are primarily focused on real-world use, and we aim to test for an entire season in a range of locations before rendering a verdict.
- Volume testing: We utilize ping pong balls to replicate ASTM tests for overall volume and ground-truth the actual space available in these backpacks for ourselves.
- Comfort and fit comparisons: These backpacks are worn by multiple members of our testing team and assessed for fit and comfort across a range of body types.
- Our backpack rating system: We take all of our in-field and bench testing feedback and use it to rate each backpack on a set of four essential metrics:
- Comfort: 30% weighted. A good score here is earned by performing well at common backpacking loads (~30 pounds) and across a range of different tester body types.
- Volume & Organization: 30% weighted. Earning a good score here requires enough volume to fit an average load out, but also efficient organization, such as external pockets, floating lids, or front stuff pockets.
- Weight: 20% weighted. All of the packs we’ve reviewed are below 5 pounds, but the highest scores went to the packs that slid in under 3 pounds. Some, like the heavy load haulers, aren’t penalized as heavily for weighing more, as it’s part of the territory.
- Durability: 20% weighted. Long-term durability is scored after at least a summer’s worth of use on these bags, and I look for stress across the pack body material, as well as webbing, plastic bits such as buckles, and the status of any zippers.
Our Expert Testers
The GearJunkie team comprises a diverse group of backpackers. From weekend warriors to seasoned thru-hikers, we’ve collectively spent many years on the trail.
Staff writer Austin Beck-Doss has clocked countless miles under the weight of bulging backpacks. A prolific rock climber, hiker, and all-around outdoorsman, he knows the value of a cozy pack for schlepping heinous loads to the far-flung corners of the world. He led the charge with this guide, accruing our initial selection of nine packs in May 2021.
Tester Chris Carter has also made significant contributions to this guide. He has extensive experience putting various backpacks through torture and torment, having thru-hiked the Triple Crown of long trails in America: the Pacific Crest Trail, the Continental Divide Trail, and the Appalachian Trail. He’s navigated the sinking sadness of a mid-hike pack failure and knows the importance of choosing a model that fits your needs and will last the distance.
Finally, I, Senior Editor Nick Belcaster, now lead our backpack testing efforts. Also a veteran of the Pacific Crest Trail, I’ve racked up many trail miles since, and worked my way through a not small number of backpacks in the process — hiking long trails from Iceland to Alaska and Patagonia. My pack needs range from carrying ultralight load-outs to an entire packraft and 8 days of food, and I’m behind our current bench testing program.
Our Testing Process and Testing Grounds
This list of product recommendations above results from thorough field testing. When testing packs, we pay careful attention to ease of use, long-term durability, comfort, and overall value. Impressive-sounding features might look good on paper, but they don’t always translate to actual performance.
Our testing has taken us pretty far. From the Huemel Trek in Argentina to off-trail bushwhacks deep in the Brooks Range, our team goes deep while testing these backpacks, aiming to get some serious trail miles on them before rendering our verdict. When out in the field, we’re looking at a few specific metrics: maximum comfortable weight, gear organization, suspension adjustability, and durability.
Beyond the field, we also dig into the nitty-gritty and conduct a series of bench tests. These include standard measurements such as pack weight and checking fit on several different body types, as well as our in-house volume testing, where we utilize ping-pong balls to confirm the volumes of these backpacks. Ground-truthing information like this allows us to stack packs head-to-head and cut through marketing claims.
Buyer’s Guide: How to Choose a Backpacking Pack

Purchasing a backpack — especially for the first time — can be challenging. Reliable gear is the foundation of a successful backpacking trip, and a good pack may be the most important item in your whole kit.
The ideal pack should feel balanced and comfortable while hiking. In camp, a well-designed pack helps keep your systems organized and efficient.
In this how-to-choose guide, I will discuss all the important considerations that will help you choose the right pack. Everything from padding and water protection to sizing and capacity is explained in detail. By the end, I hope that you’ll feel confident about choosing the perfect pack to support your backpacking adventures.
What Backpack Is Right for Me?
I’ve dug deep into backpacking packs in this guide, but there are a number of other pack designs out there that may potentially fit your needs better. Check out our Best Ultralight Backpacks Guide if you’re really trying to cut weight and carry less on your back, our Best Daypacks Guide if your trips into the woods are often confined by 24 hours, or GearJunkie’s general Best Backpacks Guide, a catch-all of all of our award winners from across the spectrum.
Capacity

Knowing roughly how much you plan on carrying in your backpack will go a long way in getting one that will cover all of your adventures. To do that, I suggest gathering up all of your backpacking kit for a volume test.
First, find a box that will fit all of your equipment (tent, sleeping pad and bag, cook set, etc.) and load it up. Then, measure the dimensions of the space occupied and multiply these figures together. Finally, a simple conversion of square inches to liters will provide you with a rough estimate of how much space you’ll need in a backpacking pack (remember to account for food).
I find the following guidelines apply to most backpackers:
- 35-45 liters: The realm of ultralight hikers with minimal equipment. In order to fit into a pack between 35 and 50 liters, you’ll need to invest in lightweight and non-bulky equipment, as well as be quick on your feet in order to avoid overpacking on food and fuel. Do that, and a pack this size can be a dream to carry. The 40-liter Hyperlite Mountain Gear Southwest has been one of our favorites for many years now.
- 50-70 liters: Most weekend backpackers will be best served by a pack within the 50 to 70 liter range. This gives you enough space to fit average backpacking equipment, as well as the occasional luxury item (such as a backpacking chair). Be mindful of the 20% rule: where your fully-loaded backpack should not weigh more than about 20% of your body weight. The Gregory Paragon 60 & Maven 58 are prime examples.
- 70-90 liters: Big load haulers will need packs of 70 liters or larger, and these bags will sport more robust frames in order to carry the added weight. If you’re aiming at equipment-intensive adventures such as mountaineering or packrafting, or need to carry bulky winter gear, look for a larger bag. The Gregory Baltoro 75 is the pack we lean on most often when carrying heavy loads.
Pack Sizing
When deciding which pack size is right for you, you’ll need to complete a few quick self-measurements. Because torso size can be very different even for two people of the same height, you should not choose your pack size simply because you are tall or short. Instead, you’ll want to determine your torso and waist measurements.
Torso measurement is the most important factor for pack sizing. To figure out yours, you’ll need a friend and a cloth tape measure. If you don’t have one, a length of rope or string and a measuring stick will also work.
Begin by resting your chin against your chest. Have another person locate your C7 vertebra at the base of your neck (it tends to protrude more than the others). Place your hands on your hips so that your hands are sitting on top of your hip bones and your thumbs are pressed against your lower back.

Ask your friend to measure the length between your C7 vertebra and the center point of your spine at the level of your thumbs. This distance is your torso measurement.
Your waist size is the circumference of your waist at your iliac crest, which is the highest point of your hip bones. The middle of your backpacking hip straps should be positioned directly on top of your iliac crest. While hiking, 80% of your load should be carried by the hips and lower body, so it is essential that your hip straps fit properly.
If you are unable to find a pack that fits both your torso and hip measurements, you will likely be able to find one with replaceable hip straps. Some packs are more adjustable than others, and it is certainly a good idea to try a pack and ensure that it properly fits before purchasing.
Pack Weight
Contemporary backpacking packs are designed to be lightweight and capable of carrying heavy loads. Most packs come with a recommended weight capacity range. Pack features that contribute to weight capacity include the frame, suspension system, and padding.
When these features become more robust, the maximum load capacity increases. For this reason, bulkier packs tend to be best for carrying the heaviest loads. Still, many modern options, such as the ULA Circuit or Durston Kakwa 55, stand out as impressive haulers even though their baseline weight is relatively low.
Some manufacturers provide load ratings for their packs. Before purchasing a pack, estimate the total weight of the loads you plan to carry.
Suspension

Suspension is a system of frames, hip belts, straps, load lifters, and harnesses that keep you securely connected to your pack. Overall, a pack’s suspension system transfers the weight of your gear onto the appropriate structures of the human body.
If fitted properly, a good suspension system allows the wearer to move freely and maintain a natural sense of balance while hauling the pack. Effective suspension relies on a combination of fit and design to maximize comfort and efficiency while hiking.
Different pack manufacturers utilize slightly different suspension features. Generally, your pack should be carried by the structure of your hip bones and the strength of your legs and lower body.
The remaining weight should be transferred between your chest, shoulders, and other parts of the upper body. Fitting your pack properly is all about fine-tuning the suspension system.
Breathability

Because your pack will be in direct contact with your body during strenuous physical exercise, it’s important that it breathes properly. Without sufficient breathability, you are likely to sweat uncomfortably and potentially overheat while hiking with your pack.
The two primary areas of a pack that should have effective ventilation are the back panel and the hip straps. Your back panel conforms to your back, and there should not be too much negative space between the panel’s surface and your back. Some contemporary packs feature a fully suspended mesh back panel that maintains airflow along the length of the back.
Other packs simply utilize a pattern of offset mesh and foam panels to create channels of airflow across the surface of the wearer’s back. Generally, suspended mesh back panels will allow for more ventilation than the offset mesh/foam styles.
Hip straps should also be designed to allow for breathability and airflow. Excessive sweating beneath a hip strap can lead to discomfort and blisters.
Organization

Not all backpackers have the same organizational preferences. There are many ways to organize a pack, and certain styles will be better suited to certain users based on these preferences.
Traditional backpacks use what is called a top-lid closure, which usually consists of a large opening that cinches closed, covered by a brain. Rolltop bags, on the other hand, are streamlined, no-frills backpacks that close like a dry bag on top, though usually aren’t entirely waterproof.
The rolltop system, used on wildly popular packs such as the Hyperlite Mountain Gear Southwest 55, has become a very common design on ultralight models. It makes it easy to eliminate unneeded backpack volume by rolling up the excess fabric.
This is especially helpful for thru-hikers whose pack volume tends to vary significantly over the course of a 5-month excursion through different climates and environments, or even between town stops. These also help compress the pack’s contents for a less bulky, more compact load. Something thru-hikers are always after.
Main Compartment
The main compartment of a backpack is the largest storage space. Some backpackers prefer a simple pack with no more than a giant singular main compartment (such as many rolltop models), and others prefer packs with lots of separate pockets and pouches. Usually, the main compartment is where your bulky and heavy items will go, including a tent, sleeping bag, and clothes.
Nearly all backpacks have a large opening at the top where users can access the main compartment. Some packs, such as the Osprey Aether & Ariel 55, have additional entry points into the main compartment, allowing users to access items within the pack without removing everything on top.

Hip Belt Pockets
Many packs include some small pockets integrated directly into the hip belt. These are convenient places to store items that you will want to access without removing your pack, like lip balm, granola bars, or a GPS device.
Top Lid Pockets
A pack’s top lid usually sits above the main compartment access point. Zippered top lid pockets are a good place for lightweight items that you will want to easily access, including a headlamp, rain layers, or a lightweight puffy jacket.
In most cases, you’ll need to remove your pack to access the top lid pockets, or you can always ask your hiking buddy to help you out.

Hydration Pocket
Some packs come with an integrated hydration pocket. Typically, a hydration pocket is a sleeve-like space where a water bladder or hydration pouch will fit easily and stay out of the way of your other gear.
A thoughtfully designed pack will also have a simple way to secure and access a water bladder drinking tube. If you prefer to drink out of bottles while hiking, look for a pack with exterior water bottle holders for easy access.
Compression Straps
Compression straps help compress and condense the load in your pack and keep the bulk of the pack’s weight close to your body. Without properly tightened compression straps, a pack can swing and sway while hiking, which can throw off your balance and cause discomfort or fatigue.
Cinch the compression straps each time you put on your pack to ensure a stable and comfortable load. Smaller items can also be clipped to or stored underneath the straps for easy on-the-go access.
Compression straps really only make sense on backpacks with frames, as they serve to pull the load into the frame to hug it closer to your back. Frameless packs, like many ultralight models, may have straps on the side, but those are generally only used for lashing things to your pack, like trekking or tent poles. They can serve to snug the load in a bit to prevent it from swaying around, but they won’t provide the same advantage as straps on a fully framed pack.
Rain Protection

When backpacking, you’ll need to be prepared to keep your kit dry in case of rain. Many backpacking packs come with a rain cover, which is usually a form-fitting piece of waterproof nylon with an elastic perimeter. The cover should fit over your entire pack and cinch securely in place.
When not in use, the rain cover can be stored in an accessible place, such as the pack’s top lid pocket. Certain styles also have fully integrated rain covers that are sewn or stitched directly into the pack.
Many backpackers prefer to use a waterproof pack liner instead of (or in addition to) a rain cover, as a rain cover leaves the back of the pack open to water seeping through to the gear inside. This method works best with backpacks with only one big, main compartment.
This is the best and cheapest way to ensure that your gear stays completely dry. And you don’t have to waste time desperately fitting a rain cover over your pack as a freak storm sweeps in, as the inside contents are already protected.
While you can just opt to use a burly trash bag, many manufacturers have come up with more durable, backpacking-specific pack liners that are designed to last for months. The two most popular waterproof pack liners are Nylofume bags, such as this one sold by Waymark Gear, and polyethylene bags, such as this one sold by Gossamer Gear.
Materials
You usually see backpacking packs utilizing one of two types of fabric: Woven Spectra laminates or some form of solid ripstop nylon. The tougher the fabric, the more durable it is likely to be, but often at the cost of increased weight. Packs like the Osprey Rook boast stellar 600- and 1,000-denier nylon packcloth, and could be carried into battle.
On the other end of the spectrum, ultralight models such as the Hyperlite Mountain Gear Southwest 55 use abrasion-resistant Dyneema or Ultra fabrics, like the Durston Kakwa 55. These need to be babied a bit more and are catered to hikers sticking to on-trail travel with minimal bush bashing. Generally, woven Spectra laminates are lighter and repel water better, but come at a higher price point.
Ultralight Backpacking Packs
Some backpackers prefer to shed weight from their kit by just about any means necessary. Because packs are one of the heaviest items in a backpacking kit, the ultralight crowd has developed and popularized a range of super-lightweight backpacking packs.
Though it sounds great to reduce weight and feel lighter on the trail, ultralight packs certainly have some drawbacks. Most of these models have reduced storage space, minimal padding, and a less substantial frame. As long as you keep your base weight to a minimum, this isn’t a problem. But if you tend to go over 15-20 pounds with your base weight, a sturdier, more supportive pack is probably the move.
Also, an ultralight pack’s general construction is thinner and less robust. This keeps weight to a minimum, but results in a significant decrease in durability. Still, for those who are all about going light and fast — and don’t plan on doing a lot of bush-whacking — ultralight packs are a viable option.
Packing Your Backpack

Though backpacks vary in design and construction, there are a few reliable methods of efficiently packing any backpack that will maximize comfort and load distribution on your forays into the mountains. A well-packed bag will feel a lot lighter than a poorly-packed bag. And it will help reduce stress and discomfort over the long haul.
Starting at the bottom of the pack, it’s a good idea to pack lighter, fluffier items such as a sleeping bag. This creates something of a pillow on your lumbar, on top of which the heavier items can sit.
Additionally, you probably won’t be needing your sleeping bag until the end of the day when you are setting up camp, so there is no problem with shoving it to the bottom.
On this same note, it’s helpful to put the other elements of your sleep system, such as a sleeping bag liner and sleeping pad, in the bottom of the pack. These items are also relatively lightweight and won’t be needed throughout the day.
Next, you want to pack the middle section of the bag, which will house the heaviest items in your kit. You want to pack this gear (such as your food bag, cooking system, and backpacking tent) as close to your back as possible.

By putting these items in the middle of your back, you alleviate a significant amount of stress from your shoulders or lower back. You can also use spare clothes that you probably won’t need throughout the day to fill in the gaps between these items. This will keep them from shifting around while you are hiking, and help prevent irregular items from poking you uncomfortably as you plod along.
Finally, at the top of your bag, you want to pack lighter items that you may want to use throughout the day, such as a midlayer or rain jacket. Once the main compartment is filled, you can put smaller items that you may want to easily access in the outside compartments of the pack. This could include a headlamp, first-aid kit, or maps.
While packing your bag, you want to think of what you’ll need throughout the day, how the weight is distributed, and if you can quickly protect all of your gear from sudden changes in weather.
If you use a rain cover as your primary protection, every pocket will be protected. But, if you rely on a pack liner, you need to make sure that the items in external storage are in additional waterproof containers or dry bags.
For more information about how to pack a backpacking pack, check out our complete guide on how to pack a backpack.
Price & Value

Backpacking packs vary in price and value. High-quality options range from around $200 to well over $500. More expensive packs may include higher-quality materials or extra features, but sometimes, simpler is better when weight is the biggest concern.
Budget
You’ll typically pay between $150 and $250 for a budget backpacking pack, and while you’re likely to get fewer features, these packs can still do some serious work. The REI Co-op Trailmade 60 ($179) is widely adjustable to a number of body types, and while there are scant bits of flash, its 60 liters of capacity will carry our overnight kit and then some. Value-oriented packs like the REI Co-op Flash 55 ($219) do a lot for the money, and we think this is one of the best packs for new hikers looking to invest a bit more.
Mid-Tier
Spending a little bit more on your backpacking pack will net you not only a few more features, but also undoubtedly some comfort and adjustability, too. The $260 you’ll pay for the Osprey Exos & Eja 58 is common in this range, and for the money, you’ll get into a nicer suspended back panel frame and enough pockets and lash points to secure dang near anything.
This price range will also host most specialized packs, like the Gregory Katmai 65 & Kalmia 60 ($330), which are both comfort-first packs with extra padding to accommodate heavier loads. The tradeoff, of course, is weight.
Premium
Spending north of $350 on a pack means it’ll leave little on the table, or you’re chasing ounces and after an ultralight pack. The Hyperlite Mountain Gear Southwest 55 ($399) is certainly in the latter camp, and weighs in at an impressive 1 pound 15 ounces. The Dyneema Composite Fabric used on this pack is the reason for the price, but if you’re headed out on a thru-hike, we think it’s worth it.
The ULA Circuit Ultra ($380), on the other hand, uses another cutting-edge textile, Ultra 400, and gains durability for it. Here, too, the material is the main driver of price, but you’re also paying a bit of a premium for going with a cottage industry brand. The attention to detail is unmatched, in our opinion, so it’s well worth it.

Frequently Asked Questions
The best backpacking pack is the one that fits your body and your backpacking objectives. We’ve included lots of excellent packs on this list.
For most people, comfort is paramount. You’ll be hiking great distances with your pack on, and you don’t want to dread doing what you love because of uncomfortable gear.
Measure your torso length and waist size carefully before choosing a pack. Determine a capacity range that allows you to pack everything you’ll need on your backpacking trips. If you like certain features or have organization preferences, seek them out when it’s time to make a purchase.

The ideal size of your pack depends on your own dimensions, as well as on the amount of gear that you plan to carry. For trips up to 3 days, a 50-70L pack is usually enough. For longer trips, look for a pack that can carry at least 60 L.
Some backpackers have truly mastered the art of thinning down their kit to the bare essentials. However, for most people, a 40L pack will not be large enough for trips longer than a single overnight excursion.

Packing your backpack properly will help you maximize its capacity and ensure that you feel balanced while hiking with a heavy load. The more organized your initial packing process is, the less you will have to rummage around looking for stuff during your trip. Knowing how to pack properly and efficiently is an essential part of a successful adventure.
Generally, you’ll want to pack items that you won’t need while hiking near the bottom of your pack. This includes your sleeping bag and extra clothes. The middle of your pack is where you should keep heavier items like food and water. The closer the heavy items are to your back, the better.
Keep frequently used items like rain layers and toiletries near the top of your pack where they will be easily accessible. In your hip strap and top lid, you’ll want to keep things like maps, lip balm, a GPS device, etc.
We interviewed thru-hikers and dedicated weekend warriors, putting loads of models to the test to narrow in on the top ultralight backpacks for any adventure. Check out our top picks from Durston, Gossamer Gear, Hyperlight Mountain Gear, and more.

Whether you’re looking to spend 100 nights on the trail or stick to a tight budget, we’ve found the best backpacking tents of 2025.
Read the full article here